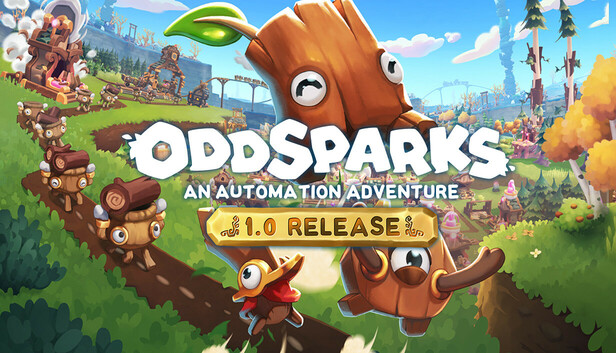
Valheim: How to Get Eitr

Over the past few months, the survival game Valheim has been more well-liked. Eitr, a brand-new magical resource that can be found in Valheim Mistlands, is also a crucial resource in the game. In the most recent update of Iron Gate’s viking survival game, it has numerous applications and can create a variety of new items. This article will show users how to get Eitr in Valheim; they must purchase enough Valheim Resources in the game. If you want to obtain this new resource, you must enter the Mists.

What is Eitr in Valheim?

Eitr, as was already explained, stands for both Resource and Stat in the game. To create new mythic armor and weaponry, Eitr is refined. Eitr stats are produced by ingesting Eitr-induced meals and will gradually regenerate. The speed of regeneration will increase if the character is wearing armor made with Eitr.

How to get Eitr in Valheim?

Eitr is a magical substance, hence it seems logical that it sprang from a fantasy substance like the sap of Yggdrasil. The Mistlands contain the roots of numerous holy trees, and you can collect sap from the trees’ green glowing regions. To gather this material, though, and to assemble it, you’ll need a workshop and a specific extractor.

To craft a Juice Extractor, you will need the following items:

Black metal x5

World Tree x10

Dvergr Extractor x1

A ferrous metal axe can be used in the Mistlands to gather ferrous metal, which can also be found in the Plains and Yggdrasil Wood (opens in a new tab). The last thing on the list, though, is quite challenging to understand.

Dvergr extractors are simple to locate because they are frequently discovered within crates that are inscribed with blue runes in the Dvergr camp. These NPCs are not hostile, but if you fight them or attempt to take their property, they will become very irate. Generally, prepare to fight extractors as soon as you grab them, or open a passage so you can flee quickly; however, keep in mind that they may also cast spells at you.

You can head to the nearest glowing Yggdrasil tree root after picking up the Dvergr Extractor and learning how to make the Sap Extractor. Install a standard workbench first, then construct the Sap Extractor to begin acquiring resources. The detailed instructions on how to obtain Eitr in Valheim are listed above. In the game, players can purchase enough Valheim Items to aid in obtaining Eitr.

Destiny 2 Lightfall Headlong Quest Guide and Vex Puzzle Solution

Players must solve a unique riddle in the Headlong mission before moving on in Destiny 2’s Lightfall campaign’s halfway point. Here are some quick tips for completing Destiny 2: Lightfall’s Headlong problem. These puzzles are based on the production of Vex adversaries, whom the player must eliminate in a particular order to advance. This guide will explain how to complete the Lightfall Headlong task in Destiny 2 and solve the Vex puzzle. Players should have enough Destiny 2 Silver on hand before starting the game.

Destiny 2 Lightfall Headlong Mission Walkthrough

One of the later Destiny 2: Lightfall campaign tasks, Headlong, requires you to finish the Strand training. You can accomplish this by using the Strand to destroy large numbers of Vex while navigating new lock problems that are connected to roadblocks in your way. You must kill matching combinations of luminous cationic harpy and regular anionic harpy in order to unlock any of these barriers by reading the lock code, which is made up of glowing or dull lights above the barrier from left to right. The harpies will all resurrect if you kill them in the wrong order, unlocking the riddle once more.

Vex Lock Puzzle 1

Vex Lock Puzzle 2

Vex Lock Puzzle 3

We have some hints for further descents after defeating the Vex and working out their obstacle puzzles, you’ll eventually enter the VexNet training session where you’ll be tested on your ability to grapple around on waves of Vex and use the Strand destructively, a difficult battle in Finally waiting.

How to solve the Destiny 2 Headlong quest puzzle

You will be in the Dawn Harbor region of Neomuna during the Headlong mission, close to the Thrilladrome Lost Sector entrance. But, a Vex barrier has barred the door, and you must work out a minor riddle to get through it. Four harpies will spawn when you take out the goblins and Vex Minotaur guarding the entrance, but don’t kill them yet.

Instead, notice the three crystals, each of which is either shining or not, above the barrier-covered entryway. Also, you’ll see that certain harpies glow while others do not. The order in which you slay the Harpy, from left to right, is displayed on the crystal above the door. You must kill a glowing harpy, a normal harpy, and then another glowing harpy, for instance, if the order of the crystals is glowing, non-glowing, and glowing like mine.

Each crystal takes a while to recognize when you’re finished, but once it does, it vanishes, allowing you to move on to the next one. When all three are finished, the barrier lowers, allowing you to carry out the remaining tasks. More harpies and a hurdle will appear later, but you can still pass by using the same strategy.

There are conventional harpies mixed in with glowing cationic harpies and non-glowing anionic harpies, making the third problem in the quest a little trickier than the others. Like before, in the left-to-right order indicated above the barrier, kill the two distinct sorts of harpies and stay away from the common ones. Players can purchase enough Destiny 2 top up in-game to help solve puzzles.

God of War: All The Hidden Rooms In Odin’s Location And How To Open Them

After the main narrative, God of War offers a variety of side quests and battles to take part in, with Odin’s Chamber being among the toughest. In God of War, there are numerous hidden chambers, the majority of them include Valkyrie boss battles or valuable loot. The majority are hidden behind Odin’s Vault, although some require trials to find. The hidden rooms in Odin’s location in God of War are all included in this guide, along with instructions on how to access them. To uncover and enter these hidden rooms, players must have enough God of War CD Keys prepared.

All hidden rooms

To avoid getting stranded at the front with nothing to do, the player must be sure they know how to open the hidden room before they start looking. Some secret chambers are difficult to locate, but finding them will mark them on the map and assist with a mission.

Since the majority of these secret chambers feature Valkyries, the hardest boss battle in God of War, it is advisable to put off locating and unlocking them until the very end of the game.

Seven can be found in three main areas:

Chamber of Secrets 1: Wildwood

Kratos and Atreus’ hometown of Wildwood is the location of the first secret chamber. After entering Helheim or after finishing the game, players should come back here. Go behind Kratos’ house and free the wooden ladder of the black vines to access it. To access the hidden room, ascend the arena, engage the foes, then drop to the following section and turn left.

Chamber of Secrets 2: The Estuary

In the Witch’s Cave, beneath the River Witch’s home, there is an additional secret area. There is a Valkyrie by the name of Kara in this particular secret room. The Valkyrie summons the adversary to fight beside her in this conflict.

Chamber of Secrets 3: Foothills

On the route to the mountain, keep going straight and turn left to climb the wall. This hidden area is where I first encounter Sindri at the foot of the mountain. Instead of turning left into the cave to the climbing point, take the new path and turn right into the cave to locate the hidden room.

Chamber of Secrets 4: The Mountain

A Valkyrie named Eir is housed in this secret room in the highlands. Continue deeper down the mountain to the enormous open cave that Kratos must claw his way to in order to reach the top of the mountain to locate this secret area. The secret room is to the right of this space.

Chamber of Secrets 5: Samuel’s Corpse

After finishing the main story quest The Magic Chisel, you can easily reach a hidden room in the Thamur’s Corpse region of Midgard.

Chamber of Secrets 6: Alfheim

In the vicinity of the Ring Temple in Alfheim, a lake contains this secret room. After letting go of the boat, proceed through the channel until you come to the lake, where you should turn left. When Kratos arrives, there will be two cave networks to the right of a little beach. The door leading to the hidden room has a horseshoe statue in front of it.

Chamber of Secrets 7: Helheim

Continue along the main road, past the wide double doors, and then climb up to the big bridge to find this hidden room in Helheim. Look to your left for some sap; Atreus needs to clear the path by shooting it with concussion arrows.

In God of War, every hidden chamber includes priceless wealth, and certain chambers also feature collectible ravens, tears of the realm, treasure maps, bosses who resemble Valkyries, and occasionally undiscovered passages. You can subscribe to Gameguidevip.com for more God of War guides.

God Of War: How To Get A Better Fire Emblem

One of the most expensive items in God of War (2018) is the Greater Crest of Flame, which is needed to assemble and improve some of the strongest weapons. In God of War, players must acquire a wide variety of different resources in order to enhance their gear. The “Eye of Muspelheim Power” enchantment utilized in the “Gauntlets of Valkyrie” and “Gauntlets of a Broken Age” gauntlets is one of the components God of War Greater Crest of Flame uses to enhance. This article will explain how to improve Fire Emblem in God of War. Players can also purchase a sufficient number of God of War CD Keys within the game.

Where to get Greater Fire Emblem

This unique artifact, which can only be found in Muspelheim, the Land of Fire, can be used to build and improve numerous kinds of armor. You can go to Muspelheim via the Realm Travel Room in the center of Nine Lakes after obtaining the Code Shard and completing the Travel Rune.

Players must first be able to cross the Bifrost Bridge on Nine Lakes in order to reach Muspelheim before they may obtain the Greater Crest of Flame. Even though God of War has seven Muspelheim code sites, getting to the Land of Brimstone and Fire only requires finding four of them.

Four of the seven Muspelheim ciphers can be located before you get to Mimir on the hill, making it easier to locate the Muspelheim ciphers. Four of the seven codes can be obtained in The Mountain, Cliffs of the Raven, Forgotten Cavers, and Alfheim for those who want to visit Muspelheim quickly and obtain the Greater Crest of Flame in God of War as soon as possible.

How to Grow Great Fire Emblem

It will take some time for the player to acquire the Greater Crest of Flame for the God of War once they have arrived in Muspelheim. In essence, Muspelheim is a challenge tower with six stories sitting on a volcano. Each level from 1 to 5 has a simple and a challenging trial. To reset the trial for the first five levels, you must finish all five levels and defeat Valkyrie at the very top. The levels will be set to “impossible” difficulty when they are reset.

You can obtain Greater Crests of Flame by finishing these more difficult trials, and if you have completed them three-fifths of the way, you can attempt the top trials once more. Repeat this procedure as often as need until you have all the Muspelheim enhancements you desire.

However, due to the immense difficulty of this realm, it is advised that Kratos ascend Muspelheim for the first time with Gear Rank 6 or above.

Other than successfully completing the Impossible Trial in the Muspelheim Realm, there is no quick or convenient way to acquire any of the Greater Crests of Flame. Once finished, a Legendary Chest will manifest in the Arena. However, as the Great Fire Emblem’s appearance inside each chest is unpredictable, not every Legendary Chest that a player opens will be filled with a valuable item. That is all there is to know about how to obtain the Greater Crest of Flame in God of War. Gameguidevip.com has further God of War player guides.

Cyberpunk 2077: How to Get the White Tiger Katana

Players in Cyberpunk 2077 can obtain the White Tiger Katana, a melee weapon that was first reintroduced in version 1.5. The Byakko Katana from Cyberpunk 2077 is unique because of its legendary ability to bash foes from close range. Additionally, there is a 35% chance that the White Tiger Katana will make the adversary bleed. The White Tiger Katana in Cyberpunk 2077 may be obtained by following the instructions in this guide, but players must also purchase enough Cheap Cyberpunk 2077 EuroDollar to do so.

One of the top melee weapons in Cyberpunk 2077 is the katana. These graceful bladed weapons are quick to strike and deal tremendous damage with each blade of the blade. When you add some unique weapon mods and skills to this, gamers become formidable opponents.

Where to get Byakko Katana in Cyberpunk 2077

The Byakko Katana is not available for purchase from Wilson’s Second Amendment store, nor can players find it through looting Night City’s streets or the more violent NPCs, in contrast to many other weapons in Cyberpunk 2077. Instead, players must successfully complete Wakako Okada’s final performance of “Professional Widow” in order to acquire the Byakko Katana from Cyberpunk 2077. When Wakako calls V after the player has finished all of her other jobs, the side job will start right away. Fortunately, finishing this side quest is among the easiest in the game.

Players only need to go to one of V’s apartments in Cyberpunk 2077 and utilize their arsenal to finish this side job. Players can immediately remove the White Tiger Katana from the warehouse because it is there already. Although the Byakko in Cyberpunk 2077 doesn’t have any special modifications already applied to it, players can still buy katana sword modifications from Wilson’s Second Amendment store and use them on the Byakko.

How to Use Cyberpunk’s White Byakko Katana

Byakko lessens the amount of stamina that is lost when attacking opponents, same as other Legendary Katana swords. Players can use this devastating melee weapon with ease when combined with the lunge effect. While the adversary is fighting the opponent, Cyber Bunk 2077. Through the Kerenzikov network software upgrade, gamers can fully utilize the “Cyberpunk 2077” White Tiger related features even in locations with a limited coverage area.

The information provided above is a detailed instruction on how to acquire and use the White Tiger Katana. Players may view more information about Cyberpunk 2077 at Gameguidevip.com.

How To Get And Use Perfect Rubies In The Witcher 3

Players will require a Flawless Ruby, a relic crafting component, in order to create the Feline Steel Sword, Feline Silver Sword, or the legendary variation of any blade in The Witcher 3: Wild Hunt. One of these ingredients for crafting that is used in several recipes is Perfect Ruby. As a result, this article will explain how to obtain perfect rubies in The Witcher 3. Players can also Buy The Witcher 3: Wild Hunt ahead of time to aid in the acquisition of additional perfect rubies.

The Witcher 3’s precise positioning of the ruby

While the Flawless Ruby in The Witcher 3: Wild Hunt is not unique nor magical, it can be difficult to locate. There is very little information about where players may be certain to find it, and it seldom ever occurs as random loot. Fortunately, gamers can locate a perfect ruby there. Adventurers can reach the shoreline and a lighthouse close to the Lornruk landmark by traveling far north of Velen’s hamlet of Heatherdun. In the Lighthouse Vault, players can search chests for a chance to find Flawless Rubies.

The ruby is hidden in boxes in lighthouses, although it is not visible when searching Lornruk’s coastal lookout. Therefore, it is advised that players visit one of The Witcher 3’s NPC vendors if they arrive at this place and are unable to find the Flawless Ruby:

Fergus Graem; Crow’s Perch, Velen

Unnamed Armorer; Midcopse, Velen

Blacksmith Hattori; Novigrad

Unnamed Armorer; Hierarch Square, Novigrad

Unnamed Blacksmith; Kaer Trolde, Skellige Isles

Unnamed Grandmaster Smith; Beauclair, Toussiant

In The Witcher 3, going to one of these NPC vendors doesn’t guarantee that Geralt will discover a Flawless Ruby to sell, similar to loot drops. If players are persistent enough, they can employ a “meditation bug,” which forces Geralt to meditate for a long period of time in order to renew the vendor’s goods. However, this procedure might be time-consuming and result in boring in-game delays. In The Witcher 3, players will require a base of at least 1,700+ Crowns to buy Flawless Ruby once the seller has an inventory of it.

Perfect Ruby a rare material utilized to make refined versions of Feline Steel and Silver Swords, among other magical equipment. When accomplishing Points of Interest on the map, Flawless Rubies can be discovered in chests all throughout the planet. Purchasing rubies from a blacksmith is the ideal method of finding them. Your level also has an impact on the merchants’ inventory, which is updated every few days. The Flawless Ruby and other artifacts of Artifact quality are more common among players of higher levels. The information provided above is a detailed instruction on how to find and utilize the ideal ruby in The Witcher 3. Players can subscribe to Gameguidevip.com for more Witcher 3 instructions as a resource.

How To Get Crystal Cores In Genshin Impact

Even though it doesn’t have many applications, the Crystal Core is one of the difficult-to-find but crucial resources that players can find in the Teyvat Wilds of Genshin Impact. Players will need this item to create Condensed Resin and to win extra rewards when passing Ley Challenges. Players will acquire resources that can be used to increase the adventurer’s power by engaging with the beasts and creatures that prowl the area, whether by killing them or by capturing them. In addition to being able to purchase enough Genshin Impact Genesis Crystals in-game, this article will explain how to obtain Crystal Cores in Genshin Impact.

What is the crystal core in Genshin Impact?

Genshin Impact’s Cohesive Resin may be created from Crystal Core, which is obtained through catching Crystalfies. These insects are typically difficult to locate during the day, but they are simpler to discover at night or in caves that are dark. Depending on where the player explores, Crystalfies will take on various forms; for example, if the player is in Liyue, Geo Crystalfies will be there. The Anemo version is available in Mondstadt. All across Meru, Dendro Crystalflies are present. In Dragonspine, they eventually encounter the Cryo Crystalflies.

How to Get Crystal Cores in Genshin Impact

There are no spawns of Crystal Cores on the ground; instead, Crystal Cores are exclusively obtained through collecting Crystalflies. Only every two days will these uncommon insects reappear in real time. However, crystal flies won’t spawn if it’s raining. Use Sayu since she won’t frighten wild creatures, and they will flee if you approach them.

In spite of the fact that different varieties of Crystal Flies will appear in various locations, catching any of them will get you a Crystal Core. There are a total of six varieties of crystalflies:

Wind Crystal Fly

Cryogenic Crystal Fly

Geographic Crystal Fly

Electronic Crystal Fly

Crystal Fly

coral butterfly

How to use Crystal Cores in Genshin Impact

Items can be made from materials like crystal cores. As a result, the following is a list of products that may be created with Crystal Cores, along with information on their properties and price:

Crystalline resin

Rewarded with two sets at once, this item can be used to revive Leyline Flowers from Leyline Outcrops or petrified trees in the realm.

Cost: Raw Resin x 40, Mora x 100, and Crystal Core x 1.

Tree-Killing Drug

a medicine that slows plant growth while raising Dendro RES.

It throws the plants into a profound sleep rather than destroying them.

Cost: 100 Mara, 1 Crystal Core, 1 Sumeru Rose

Potion for Frost Shield

a mystical concoction that raises Cryo RES and increases resistance to intense cold.

Cost: One Crystal Core, one Mistblossom Corolla, and one hundred Mora

Windproofing agent

A mysterious concoction that improves Anemo RES and renders the user wind-resistant.

Cost: One Crystal Core, one Dandelion Seed, and one hundred Mora

Stove of the Adepti Seeker

a transportable stove for cooking outside of battle.

Cost: 500 Mola, 2 Crystal Cores, 1 Fire Oil, 2 Iron Bars

The instructions listed above explain how to obtain the crystal core under the influence of the original gods. To discover more about the news and guides related to the effects of the original gods, players can subscribe to Gameguidevip.com.

Genshin Impact: How To Gain Friendship Experience And Increase Friendship Levels

The plots and histories in Genshin Impact are abundant, and players can give their characters more voices and stories by raising each character’s friendship level. To unlock new character stories and voiceovers in Genshin Shock, players must raise their friendship levels. In this article, we’ll go over how to level up your friendship in Genshin Impact. Players can also purchase enough Genshin Impact Genesis Crystals in-game to help them level up their friendship as well.

What is the experience of friendship

The friendship level of the player’s current party can be raised via friendship XP. Additional character stories that explain more background lore and unlock more voice lines are unlocked as friendship levels rise. A calling card unique to that character will be given to the player if their character’s friendship level hits 10. Travelers are not eligible for friendship experience, and characters that are not already in your current party cannot grant it.

How to farm Friendship EXP in Genshin Impact to increase a character’s friendship level

Finish daily commissions

In Genshin Impact, completing daily commissions and collecting daily commission incentives from Catherine of the Adventurer’s Guild are two of the simplest methods to gain partnership XP. Players cannot receive daily commissions unless they have attained adventure level 12 and have finished all of Genshin Shock’s world quests. Each commission awards 25–60 friendship experience, depending on the player’s current adventure level. So be sure to finish all four daily commissions to earn 4x friendship experience points.

Take down bosses to earn rewards.

In Genshin Impact, eliminating foes in Teyvat grants you friendship XP as well. Friendship XP is awarded by clearing domains and taking down the usual weekly bosses. Genshin Impact weekly bosses like Chlide in the Golden House can be defeated for a bigger reward of 55–70 Partnership EXP. In addition to Mora (flower of wealth) and resources for character advancement, the outcropping of the leylines will also give friendship experience, albeit it is considerably lesser than the domain and BOSS (flower of enlightenment).

Be yourself at the event.

If a character is not in your party, players cannot raise their friendship level with that character. They only need to join the party when the player earns Friendship EXP; they don’t have to be present on the field all the time. Upon completion, Domains award players with Companionship EXP in addition to materials and artifacts, and players will be rewarded; just make sure you have enough resin. The friendship EXP that players get in cooperative mode will double as of version 1.5. By doing so, players will be able to clear out areas and take down character-specific bosses more quickly. I advise Coop if you want to concentrate on just one character.

The information provided above is a complete explanation on how to level up your friendship in Genshin Impact. In order to discover more about Genshin Impact’s guide, players should sign up for Gameguidevip.com.

Fortnite: How to Get the Snowball Launcher

Players in the well-known battle royale can now partake in some holiday mayhem thanks to Fortnite Winterfest 2022. There are numerous simple challenges, but one calls for the player to locate the Snowball Launcher, which is a need for the event quest accessible through the main menu or the Cozy Lodge. Players must use the Snowball Launcher to eliminate five adversaries as part of this Winterfest challenge. In order to swiftly obtain the Snowball Launcher, players must purchase enough Fortnite V-BUCKS in the game.

What is a Snowball Launcher?

A seasonal weapon that resembles a grenade launcher is the snowball launcher. But players shoot snowballs at opponents instead of explosives. The snowballs fired by this area-explosive weapon burst upon impact, and each magazine may carry six rounds. It usually reappears during the Winter season or as part of the yearly Winterfest challenge. It is both a holiday skin for the Grenade Launcher and a separate weapon with a unique appearance.

Fortnite: All Snowball Launcher Locations

Here are the locations of all the Snowball Launchers in Fortnite Chapter 4 Season 1:

Chests and Rare Chests:

These two types of chests contain snowball launchers. As a result, players should ideally go for locations like POIs that have a lot of uncommon chests.

Ground Loot:

Snowball Launchers could appear in ground loot as well, but this is less likely. However, gamers should also exercise caution when looking for potential ground-level riches.

Gift:

Players must continue seeking for snowball launchers because gifts are one of the main components of each winter and they can be found there. They are more common in POIs and roam the entire map.

NPC Scrapknight Jules – Missplit:

Meeting the NPC Scrapknight Jules is by far the best way to obtain a Snowball Launcher. If you have enough gold bars, you can buy a snowball launcher from her instead than searching the entire map. She sells them for gold bars.

How to Get the Snowball Launcher

Up to January 3, 2023 at 9AM ET, the Snowball Launcher will take the place of the Rocket Launcher in the game. That implies that obtaining a rocket launcher at this time is not possible in any way, shape, or form. Despite having a slightly different mechanism, the snowball launcher uses the same ammunition. The grenades fired by the snowball launcher explode instantly upon collision as opposed to launching rockets straight ahead until they detonate on impact.

The Snowball Launcher is challenging to locate, much like the Rocket Launcher, though spawn rates could rise throughout the event. Snowball Launchers can be obtained from supply drops, within oath chests, inside chests, and as floor loot. There is a character on the map that sells them, therefore there is a means for players to ensure they will receive one during a match.

It is advised that players use other weapons to incapacitate adversaries before firing the Snowball Launcher because five enemies can be killed with it once the player has it. Players can subscribe to Gameguidevip.com for additional information about Fortnite Winterfest challenges after defeating the adversary and moving on to further Fortnite Winterfest challenges.

Unlocking Warhammer 40K Darktide Tips And Tricks For New Players

Activate Warhammer 40K A survival horror game is called Darktide. The game Darktide casts the player as a criminal who later changes into an inquisitor and is set in the hive metropolis of Tertium. The player’s objective is to exterminate the Chaos demons and their adherents from the area. In this beginner’s guide, we’ll provide players some pointers and advice so they can better grasp the game, learn how to survive, and progress through the game’s levels. Players can purchase enough Warhammer 40000 Darktide Items in the game to improve their adventures.

Recognize Your Enemy

Knowing your foes is the first step in the game for new players; there are four different categories of enemies in Darktide. You’ll come across a surprising number of opponents in addition to the usual hordes and specialized opponents of a particular level. It will be simpler to vanquish the remainder of the Horde the sooner you defeat these foes. Additionally, there are elite adversaries that are particularly strong. These are even more uncommon than specialist adversaries, but they may deal a lot more damage and quickly eliminate your crew. To win the game with few losses, you might learn how to take advantage of your opponents’ advantages and disadvantages.

Stick to Allies and Teams

Warhammer 40K Darktide is a co-op game, as everyone is aware. Whatever the case, it’s a good idea to constantly communicate with your team and allies. Stick to teams of two even if you are separated so that you have allies to turn to if you are surrounded by foes and need to be revived. You will miss out on several helpful perks if you avoid your colleagues, whether they are genuine gamers or bots. You might receive numerous advantages appropriate to the class you play by keeping close contact with teammates. Anything can be a buff, including unlimited ammunition, increased melee speed, and increased elite damage. The player’s “toughness” can be restored more quickly while they are near an ally.

Know what difficulty level to play

Darktide has five different difficulty settings, but none of them explain how they differ from one another. Because of this, it may be challenging to decide where to begin or when to increase the complexity as your rejection rate rises. It is advised to begin with Sedition 1 if you are just getting started with the game. There aren’t many particular foes that players need to confront right now because the enemies are so weak. Players that just wish to learn new concepts, fighting strategies, and character skills should be able to succeed at this level. The difficulty can be boosted by two levels once the player reaches level 10 or so, giving them access to some great gear and two passive abilities. Then consider raising level 3, which can provide more experience and gold coins.

High rating doesn’t mean high damage

In Darktide, a single piece of gear may have several stat bars and effects, and each item has a rating that might be viewed as the pinnacle of all other attributes. A weapon with a higher rating may not always deal more damage than one with a lower rating. The reason the rating numbers are so high could be due to another stat, like mobility.

These are the Warhammer 40K Darktide new player talents. Players can follow our Gameguidevip.com site and check back for future updates if they still require this kind of connected information.